Showing posts with label crafting. Show all posts

Friday, February 17, 2012

Thing-a-Day 2012: #17 Felt Dahlia Pins

#17 Felt Dahlia Pins
Another felt craft from my huge stash. These are 4" pins, 3 layers of leaves with 2 small 4 or 5 petal flowers in the center covered with small beads.  I didn't have any pin backs in my stash so when I go to the craft store again, I'll pick some up so I can finish these. Only one of these is mine. The other will be used as a gift package decoration. I plan on making another one in purple and possibly one in yellow. I haven't quite decided. I think they are really pretty and they were super easy to make.

Wednesday, February 15, 2012

Thing-a-Day 2012 - #13, 14, 15

#15 - Baker's Apron
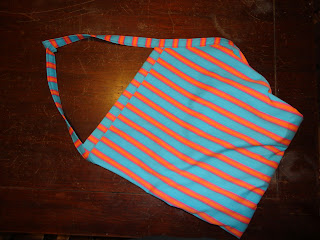
I found this yummy fabric at the local Goodwill - on a 1/2 off Saturday, no less! - and knew it would make a great apron someday. And that someday is today! I tried to use a pattern found on the Martha site, but it didn't include directions and the pattern was in 13 pcs and I couldn't figure out how to piece it together. So I winged it. I measured it out, cut, sewed, cut again, sewed and ironed and sewed and now I have an apron to protect my clothes when I'm tossing stuff around the kitchen :)

#14 - Valentine's Day Card
Happy Valentine's Day! I have a bag of cards that came with some promo a long, long time ago. And you know I save stuff like that to use "someday". I was digging around in my stash thinking to make an ATC, but when I discovered that little bag of goodies, today's thing-a-day was a cinch.

#13 - Mustaches
Ok, this one is lame. I was lazy all day. Mondays usually go that way. And while I was waiting for dinner I knocked these out of some scraps of felt, thinking I'd attach them to some drinking straws and take a cute, funny family picture. No go. These 'staches arent' fit to be seen, let alone groomed for photo ops. I'll have to try again some other time, when I'm more likely to have the energy to actually care.

Friday, February 10, 2012

Thing-a-Day 2012 - #10 3-D Paper Ball Ornaments

3-D Paper Ball Ornaments
I found the instructions for this ornament here. I think the all white style is my favorite. I want to make some more of these in all kinds of sizes. I also want to try making a large one out of clear plastic or vellum and then insert a small, low watt light bulb inside to hang as a pendant light. I think that could be amazing!

Thursday, February 09, 2012

Thing-a-Day 2012 - #9 Felt Valentines

Felt Valentines
I saw somewhere on the 'net some felt valentine ornaments, but I am running out of places to hang things so I left off the ribbon and made these to nestle in a bowl. Unfortunately, the bowl I wanted wasn't available, so I stuck them in my mondo mug. I think they're cute and I got to practice my blanket stitch again :)

Also, they were made completely with supplies I had on hand AND they are stuffed with scraps! Waste not, want not. I used up the scraps from these hearts in 3 of them and then pulled out a bag of fabric scraps from a bag I made a couple years ago. Yes, I kept my scraps for that long. Yes, I always keep the scraps. You never know when you may need a patch, or a small bit for another craft :)

Wednesday, February 08, 2012

Thing-A-Day 2012 - #8 Felt Heart Bunting

#8 - Felt Heart Bunting
I had a huge stack of felt that I bought several years ago for another craft that I never got around to finishing. I've seen these heart buntings around the 'net for awhile now, not only in felt, but paper as well. It took me longer than I thought to hand cut all those hearts and in the end I had to cut some more to complete the entire room. On the up side, I did use up most of my felt bits and instead of tossing all those scraps I stuffed them into an old mason jar, tied it with a bow and called it "bonus craft!"
And later I can pull those scraps out and do something else with them ;)
There is nothing better than making something awesome out of scraps that would normally go in the trash. 

Tuesday, February 07, 2012

Thing-a-Day 2012: #7 - Valentine Specimen Art

Valentine Specimen Art
I already had the frame and tons of paper scraps so this craft was a no-brainer. I do wish I'd had a heart punch to make this go a little faster. I didn't enjoy hand-cutting 20 little hearts for this. I think I'll need to skip my next craft because it requires almost 100 tiny hearts. I need a heart punch. I'll leave that craft on the list for next year, I guess. I'll also add the punch to my Christmas Wish list :)

Side note: I missed days 4-6 because I was sick - as in really, really sick. It rarely happens that I am so sick I'm stuck in bed for 3 days. I was so bummed that I missed out on completing the Thing-a-Day challenge this year. Ah well...can't win 'em all.

Friday, February 03, 2012

Thing-a-Day 2012 - #3 Circle Ornaments

Paper Circle Ornaments
I've seen these around the 'net and in several magazines lately, so I thought I'd give them a try. And goodness knows I have plenty of paper laying around to play with :)

Thursday, February 02, 2012

Thing-a-Day 2012 - #2 Kitty Cat Origami

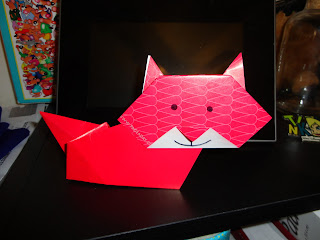
Thing-a-Day No. 2: Kitty Cat Origami
I have this Origami calendar from 2005 that I threw in my craft supply box, since the origami paper is still in good condition and I knew I could use it at a later date. And I have. Several times! A few years ago I made origami hearts and fish and things for the thing-a-day challenge. This year I have several origami bits I'd like to make. I especially like this kitty because, if I change the color to something a bit more orange-ish it could look like a fox! Way cool :)

Wednesday, February 01, 2012

Thing-a-Day 2012 - #1 Wire Snowflakes

You know those annoying, plastic-coated wires that are used to fasten toys to their boxes? I save those. Just for this reason: to reuse as a craft supply! Today for craft #1 of the Thing-a-Day 2012 challenge I used some of my wire stash to make these snowflakes. They are now hanging in my kitchen window to help remind me that it really is winter here, despite the fickleness of the snow this season!

Saturday, February 19, 2011

Knitwit Files Vol 7: Slouch Hat and Pattern


Trial run with my first pattern inspired by some others I'd read but written by me! It's not slouchy enough for my dreads, but it works quite well for The Girl. She snagged it up before it was even finished! The next one will have to have an excessive amount of slouch and a bit bigger headband if it's going to fit me. And if I make it big enough, I make even get to keep it! :)


Here's the pattern if anyone would like it.

1. CO 68 stitches in the round. Place marker, join round, be careful not to twist!
2. K2P2 Rib for 1 1/2" on #8 - 16" circular knitting needle. It's gonna be tight, but it'll get easier soon enough.
3. Time to increase: K1M1 all the way around. You should now have 136 stitches.
4. Knit until body is 6 1/2"
5. On last knit row, place marker every 34 stitches (use color other than 1st one so you know where the beginning of the round starts)
6. Begin decrease: Row 1*K2 K2tog(15 times) K2* repeat ** 3 times - make sure to move markers. 76 stitches left
7. Row 2: *K3 K2tog(7 times) K2* repeat ** 3 times making sure to move markers - 48 stitches left
8. Row 3: *K2 K2tog(4 times) K2* repeat ** 3 times, moving markers - 32 stitches left
9. Switch to (4)DPNs
10. K32 putting 8 stitches on each DPN - 32 stitches
11. K2 K2tog(2 times) K2 -all the way around. 24 stitches left
12. Cut tail of thread at least 18", thread on needle and pull through all stitches, pulling tight to close up opening. Weave in ends.

Materials: #8 16" circ, #8 DPNs, stitch markers, tapestry needle, yarn #4 worsted acrylic blend about 200 yds (244yd skein)

Sunday, January 30, 2011

The Knitwit Files Vol 5: Bold Stripes


Just before Christmas I had found some acrylic "fun yarn" at a local discount store. I planned on using it to practice different stitches, but when The Girl saw the purple she immediately claimed it for her next scarf. So I went back and picked up enough black to make a nice long scarf for her. I also picked up a little extra black for an animiguri project that I'm still working on.

The scarf is knitted in straight stitch. It went fairly quickly. The hardest part of the whole project was weaving in all the ends left from switching colors. One of these days I'll figure out how to carry the yarns up the side. I don't care for the texture of this yarn at all. It kept snagging on my bamboo needles. Cheap acrylic yarn is NOT pleasant to work with. I'm glad I only have a couple more skeins of this stuff. I may just use it for the cores of my Japanese Temari balls (see here) that I make and skip the frustrations and unpleasantness of knitting with it.

Sunday, January 23, 2011

The Knitwit Files Vol 4: Mohawk Hat


Little Man's new winter sport hat


Let me first start by saying, I did NOT knit this hat. Little Man saw it (sans 'hawk styling) lollygagging around at Penney's when we picked up his winter coat. Being the "in" thing to wear this season it immediately caught and held his attention. I gave in and bought the silly thing and it laid around the house for some time, getting no use whatsoever.

A couple of nights ago I just couldn't stand it any longer so I gave the poor little dear a bit of a makeover. I picked up some yarn to match the braids and cut about a zillion 4" pieces and stacked them next to my chair. While watching TV I was able to latch hook these bits of string into the stitches of the hat, creating a lovely faux-hawk along the top center. (Any of you fashionistas out there will have seen several of these types of hats available at the local mall.)

No longer a skinny little nothing, this hat now has some major 'tude. Little Man was suitably impressed with his momma's crafting skills. I daresay this hat is about to see a wild and crazy time!

Monday, January 03, 2011

Goals for 2011

Here it is! The 2011 Goals List!

Goal #1: Keep Blogging! I did really well up until the move and computer issues. I think 2011 will be even better, even though I still have no computer and we still need to move into a house at some point! I may even get some iniative and put all my blogs in one place! :)

Goal #2: Marathon! I am absolutely determined to do that marathon. Nothing is going to stop me this time. Nothing.

Goal #3: Family Photo Challenge. I read a blog about a mom that made a point of taking a family photo once a month for the whole year. I think this is a great idea and I'm going to do it. So at some point each month I will beg, bribe, and/or trick my family into a group photo.

Goal #4: Project 365. I will once again be continuing the Project 365 challenge. I've done it for 2 years and I think it helps capture our lives very well. I just hope P365 for 2011 stays caught up. I may change the format to make it a little easier for me this time around.

Goal #5: Webstore. I'm going to continue to develop my webstore. The goal is to have the store up and running by September. If I can't make it happen by then, it'll never happen. Sad, but true.

Goal #6: Debt. We will continue to pay down our debt. It's a sizeable amount, so I know we won't get it all paid this year, but we're going to make a huge dent in it!

Goal #7: Stay Positive! I sometimes let my "pragmatism" get in the way and tend toward the negative. I really want to get away from that. No more sarcasm, no more cynisism, no more. There's no room for negativity here anymore.

Goal #8: Crafting. This year's new skill will be Tatting. I've found several wonderful websites dedicated to Tatting, so I know I'll be able to find help. I'll be slowly acquiring the equipment and then this summer I will begin! I imagine most everyone will get a tatted snowflake for Christmas this year :)

Goal #9: Reading. I'm not going to set a number, because that would take all the fun out of reading. But I do want to read a bit more than the last couple years. So if I make it to 60 or 70 books this year, I'll be happy.

Saturday, June 12, 2010

Inspiration Station: Embroidery

I am so in love! Not only is it Queen Elizabeth I, but it's embroidery! The dress, the fencing, those trees! So amazing! This is definitely going on my "to-craft" list!

tutorial here

Here's a close up look at one of those trees:
Truely amazing work!

Wednesday, May 26, 2010

Project 365: Week 20

5-9-10
Sunday, May 9, 2010 All the things I use to get ready in the morning.

5-10-10
Monday, May 10, 2010 After the ball game, J relaxed with a bit of play-dough time...and what does he make? A baseball player!

5-11-10
Tuesday, May 11, 2010 Napkin rings are finished. I need to make 2 more for the Independence set. I think I may make one more set before posting these...

5-12-10
Wednesday, May 12, 2010 My eye keeps landing on this frame next to the door. We've lived in our new trailer for over a year and I still haven't done anything with this picture frame. Sad...sad, I tell ya.

5-13-10
Thursday, May 13, 2010 Week in the Life taught me that I need to take more pictures of me. So here is one of me enjoying a rare treat: Dr. Pepper!

Photobucket
Friday, May 14, 2010 Normally I'd post a pic of J during the game, but the sunset over the ballfield was too gorgeous not to share!

5-15-10
Saturday, May 15, 2010 The season is over. But we still see J's baseball stuff everywhere! Now we wait to see if he made the All-Star team.

Tuesday, May 25, 2010

Project 365: Week 19

Photobucket
Sunday, May 2, 2010 I spent the day looking through my magazines. I also sorted and stored a few since I'd read them several times and had received the newest issues. I love art/craft/scrap magazines!

5-3-10
Monday, May 3, 2010 Look at my cactus grow!

5-4-10
Tuesday, May 4, 2010 When the hot weather rolls around we start making a lot of these. I'm thinking about hopping into Target for another set!

5-5-10
Wednesday, May 5, 2010 Crafting day! Making some napkin rings for the new webstore!

5-6-10
Thursday, May 6, 2010 It's not often I get bored. I was sitting at the table among my crafting/sewing things and found J's little R2D2 toy. I started fiddling around with it and ended up having some fun :)

5-7-10
Friday, May 7, 2010 The kids don't have school today. And J decided to stay in his PJs for a while and watch some cartoons.

5-8-10
Saturday, May 8, 2010 Is it too early to be thinking about Halloween?! Not for me! It's time to start crafting/sewing the costumes!

Thursday, May 13, 2010

Web Store in the works!

I am finally getting somewhere with my webstore. I've been wanting to do this for quite some time and it's one of the goals on my 2010 Goal List. I'm almost there!


I spent most of my free time yesterday working on the designs for my store name and logos. I thought I'd had finally settled on the name Thimblina. When I started putting it all together the name just wasn't working for me. So I started playing with my grandma's name, then my name, my initials, which led to a cute name : DIBS Designs. I thought that would work, but then I typed in Dibble Street, which is where my piano teacher lived when I took lessons all those years ago. Which then led to Thimble Street. And that is where I am! I really wanted to keep the thimble theme, especially since I use thimbles all the time. So there it is: the name and logo for my new webstore! I'll let you all know when it's online and stocked with goodies! For now, here's the new Thimble Street blog.


Sunday, April 11, 2010

Lazy Day Sunday...?

Isn't Sunday supposed to be a day of rest?
I was so busy today! plus having a zillion things running through my head....
among the items on my mental to-do list:
making treats for J's baseball team!

These treats are inspired by the amazingly talented Bakerella.
I'll be posting pictures later tomorrow when they are all finished. I can't wait!


Monday, March 08, 2010

DIY Camera Strap Cover

This is my new camera strap cover. Hear me rawr!

I have found that when I actually use my strap around my neck I am constantly adjusting it and rubbing my nect where the strap is cutting into my skin. I used to just wrap a bandana around it and safety pin it together - which worked really well actually. But lately I've seen lots of cute camera strap covers out there and I thought "I can make one of those" so I hopped on the internet and found a tutorial over at Design*Sponge. I read through their instructions to get the gist of it and then tweaked their design to fit my design. I never do things the way other people do things! Instead of one solid color, front and back, I wanted to do a patchwork reversible design, using 4 fabrics. Go me.

I followed all the directions, adjusting for the extra seams. Unfortuately, my first strap turned out too small. I'd forgotten the extra side seam allowance!  But I refused to give in. I made the necessary adjustments and made a second one, this time changing the way the fabrics were stitched together (i.e. not making a tube and turning it!) and it worked way better. The scraps went into the scrap bag for later crafting ideas. And now I have a pretty, and comfortable, camera strap cover!

Friday, March 05, 2010

Zentangles!

This is my first Zentangle. It's the opening page of my "scribble book". I read an article about Zentangles in the December issue of Cloth, Paper, Scissors. And then a few weeks later I saw some new Zentangle postings on Craftster. And of course, I felt like I needed to try this out. I used to make these types of doodles all the time when I was younger, and I remember doing something similar for an art class in college. I have so many projects going at once I don't know how often I'll be doodling, but when the urge strikes I'm already set up to go!